Tools & Plugins
OMSI Crossing Editor Tools
Better camera controls for OMSI 2's Crossing Editor!
745 Downloads
1 Versionen
<p class="text-center"><woltlab-metacode data-name="attach" data-attributes="WyIxOTc0NjMiLCJub25lIiwiZmFsc2UiXQ=="></woltlab-metacode></p><p><br></p><p class="text-center"><span style="font-family:'-apple-system', BlinkMacSystemFont, 'Segoe UI', 'Noto Sans', Helvetica, Arial, sans-serif, 'Apple Color Emoji', 'Segoe UI Emoji';"><span style="font-size: 16px;">Better camera controls for <a href="https://store.steampowered.com/app/252530">OMSI 2</a>'s Crossing Editor!</span></span></p><p><br></p><p></p><p><woltlab-metacode data-name="flag" data-attributes="WyJnYiJd"></woltlab-metacode> <strong> English:</strong></p><woltlab-spoiler data-label="Click here for all information!">
<h3>
<strong><u>Why?</u></strong>
</h3>
<p>For years, map developers have been forced to use the basic OMSI Crossing Editor (<kbd>OMSI 2\SDK\OmsiObjEditP.exe</kbd>) in order to add pathways to their maps. <br></p>
<p>In this tool, the <strong>only </strong><strong>way</strong> to control the zoom level of the camera is to click a separate menu and drag a slider with your mouse! This is very painful to use. <br></p>
<p>On top of this, the default camera FoV (Field-of View) value is locked at 30°, compared to 45° inside OMSI 2's main game, which is slightly disorienting. <br></p>
<h3>
<strong><u>Features</u></strong>
</h3>
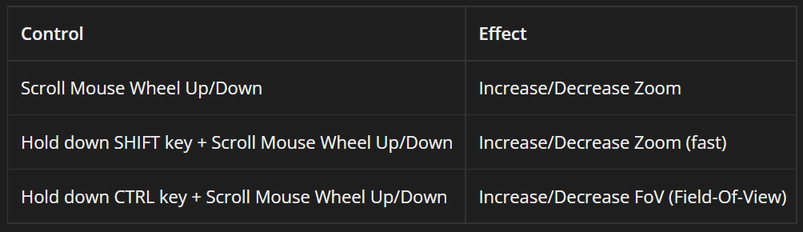
<p>Not to worry - with OMSI Crossing Editor tools, you now have full control over the Zoom & FOV inside the OMSI Crossing Editor! With my tool, you can:</p>
<ul>
<li>Set default values for the camera zoom & FoV</li>
<li>Set minimum and maximum limits for the camera zoom & FoV</li>
<li>Easily adjust the Zoom & FoV with your mouse's scroll wheel (including holding the SHIFT key to increase/decrease speed)
<ul>
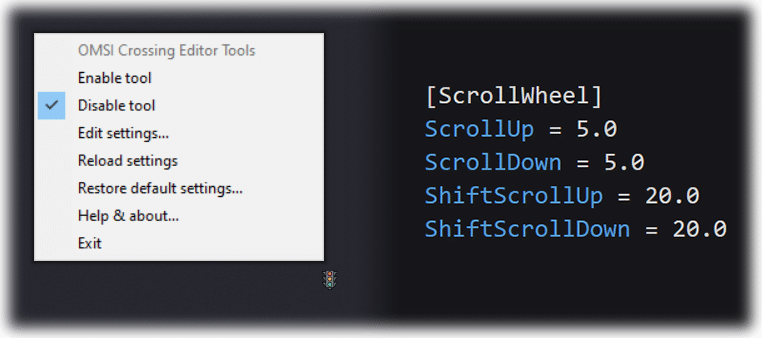
<li>The scrolling speed can be fine tuned via configuration files</li>
</ul>
</li>
</ul>
<p><br></p>
<p class="text-center"><woltlab-metacode data-name="attach" data-attributes="WyIxOTc0NjAiLCJub25lIiwiZmFsc2UiXQ=="></woltlab-metacode></p>
<p><strong></strong><br>There is also multilingual support for <strong><woltlab-metacode data-name="flag" data-attributes="WyJnYiJd"></woltlab-metacode> English, <woltlab-metacode data-name="flag" data-attributes="WyJmciJd"></woltlab-metacode> French, <woltlab-metacode data-name="flag" data-attributes="WyJkZSJd"></woltlab-metacode> German, <woltlab-metacode data-name="flag" data-attributes="WyJwbCJd"></woltlab-metacode></strong><strong> Polish and <woltlab-metacode data-name="flag" data-attributes="WyJmaSJd"></woltlab-metacode> Finnish.</strong><br><strong></strong><br>Please note: Additional functionality such as customization of modifier keys is reserved for potential future updates.<br><strong></strong></p>
<h3>
<strong><u>Installation & Usage (!</u></strong>)
</h3>
<p><strong><span style="color:rgb(255,0,0);">---> NOTE - These are not what you expect! It is critical that you follow all the below steps and in the exact order given! <---
<br><br></span></strong></p>
<p><strong>Please note that this tool requires .NET Framework 4.7.2 to be installed.</strong></p>
<p>If you are using Windows 7 or a version of Windows 10 released before April 2018, you must install it manually from <a href="https://dotnet.microsoft.com/en-us/download/dotnet-framework/net472">here</a> ("Runtime").</p>
<p>Otherwise, no action is required.</p>
<p><br></p>
<p><strong>Please note</strong> that the OMSI Crossing Editor has a bug where, after an unspecified amount of time, the main view will freeze randomly. This bug is not caused by OMSI Crossing Editor Tools. If this happens, simply save your work, close and re-open the application, then disable and re-enable OMSI Crossing Editor Tools.<br></p>
<ol>
<li>Ensure you have OMSI Crossing Editor downloaded correctly:<br>--- <span style="color:#FF0000;"><strong>The file name must be</strong> <kbd>OmsiObjEditP</kbd> - </span><strong><span style="color:#FF0000;">the tool will not work if you have renamed it</span></strong><span style="color:#FF0000;">!<br></span>--- The file must be located in the <kbd>SDK</kbd> folder of your OMSI 2 installation folder, so OMSI Crossing Editor can work correctly.<br>--- e.g., <kbd>C:\Program Files (x86)\Steam\steamapps\common\OMSI 2\SDK\OmsiObjEditP.exe</kbd><br>--- You can download the OMSI Crossing Editor from <a href="http://www.omnibussimulator.de/download/OMSI-SDK_Tools_1.00.zip">here</a> (extract to the <kbd>OMSI 2\SDK</kbd> folder)
<br></li>
<li>Download the OMSI Crossing Editor Tools .zip archive, open it, and extract the contents of the "Tool" folder to any folder on your PC.
<br></li>
<li>Exclude this folder from <strong>all </strong>anti-virus programs on your PC - or you may experience problems.
<br></li>
<li>If you have any games open that use anti-cheat software, please close them!<br>You must do this step each time you launch the tool.
<br><br>These steps are necessary due to the nature of the tool.<br>Don't worry - the source code of this tool is available to view <a href="https://github.com/sjain882/OMSI-Crossing-Editor-Tools">here</a>.
<br></li>
<li>Right click on the OMSICrossingEditorTools .exe / Application file and click "Run as administrator".<br>Click "Yes" if prompted by User Account Control.<br>A small 🚦 traffic light icon should appear in your notification tray (bottom right of your taskbar)<br><strong><span style="color:rgb(255,0,0);">It is critical that you do this step <u>before</u> continuing onto the next one (due to a bug in OMSI Crossing Editor)</span></strong>
<br></li>
<li>Now, open your copy of the OMSI Crossing Editor.
<br></li>
<li>In the top-left, click <kbd>Object</kbd> > <kbd>Load...</kbd> and open your desired <kbd>.sco</kbd> file from <kbd>OMSI 2\Sceneryobjects</kbd>.<br><strong><span style="color:rgb(255,0,0);">It is critical that you have an object/crossing loaded at this stage.
<br></span></strong></li>
<li>Right click on the previously mentioned 🚦 traffic light icon in your tray, and click "Enable tool" .<br></li>
<li>Click on the OMSI Crossing Editor so it is the focused window.<br><strong><span style="color:rgb(255,0,0);">The tool will not work unless you have the OMSI Crossing Editor focused.
<br></span></strong></li>
<li>Use the controls listed in the the table under the "Features" section above.
<br><br>If you are opening a new object in the Crossing Editor, please disable the tool before doing so, and re-enable it after it is loaded.<br></li>
<li>If you wish, you can change some settings by right clicking on the 🚦 traffic light icon in your tray, then "Edit settings..." - a text file with descriptions for each setting in your language will open. You can adjust various parameters here.<br>Once you have finished, save and close the file, then right click on the 🚦 traffic light icon in your tray, then "Reload settings".
<br></li>
<li>Once you have finished using OMSI Crossing Editor for the day, it's a good idea to right click on the 🚦 traffic light icon in your tray, and click "Exit".</li>
</ol>
<p><br></p>
<h3>
<strong><u>Credits</u></strong>
</h3>
<p><strong><woltlab-metacode data-name="user" data-attributes="WyIxMDM4MyJd">sjain</woltlab-metacode> </strong>- Reverse engineering of OMSI Crossing Editor, creating this tool<br></p>
<p><woltlab-metacode data-name="user" data-attributes="WyIxMzM4OSJd">Nano</woltlab-metacode> - Testing & suggestions<br></p>
<p><woltlab-metacode data-name="user" data-attributes="WyI3Mzk0Il0=">BowsyCh16</woltlab-metacode>, <woltlab-metacode data-name="user" data-attributes="WyI3OTQ0Il0=">Sobol</woltlab-metacode>, <woltlab-metacode data-name="user" data-attributes="WyI5NjgxIl0=">volvorider</woltlab-metacode> - Testing & translation<br></p>
<p><woltlab-metacode data-name="user" data-attributes="WyI5MDQ2Il0=">Erilambus</woltlab-metacode>, <woltlab-metacode data-name="user" data-attributes="WyI1MTYwIl0=">HalberCode</woltlab-metacode> - Translation<br></p>
<p>Various C#.NET libraries - <a href="https://github.com/rickyah/ini-parser">ini-parser</a>, <a href="https://github.com/shy2net/WinputManager">WInputManager</a>, <a href="https://github.com/erfg12/memory.dll/">Memory.dll.x86<br></a></p>
</woltlab-spoiler>
<p></p><p><woltlab-metacode data-name="flag" data-attributes="WyJkZSJd"></woltlab-metacode> <strong> Deutsch:</strong></p><woltlab-spoiler data-label="Klicken Sie hier für alle Informationen!">
<h3>
<strong><u>Warum?</u></strong>
</h3>
<p>Viele Kartenentwickler verwenden den einfachen OMSI Crossing Editor unter <kbd>OMSI 2\SDK\OmsiObjEditP.exe</kbd>, um ihren Karten Pfade hinzuzufügen.</p>
<p><br></p>
<p>In diesem Tool lässt sich die Zoomstufe der Kamera lediglich über ein separates Menü und einen Schieberegler mit der Maus steuern! Das ist sehr mühsam zu bedienen.<br></p>
<p>Darüber hinaus ist der Standardwert für das Sichtfeld der Kamera auf 30° festgelegt, während er im Hauptspiel von OMSI 2 bei 45° liegt, was etwas verwirrend ist.<br></p>
<p>Dieses Tool behebt diese Probleme.<br></p>
<h3>
<strong><u>Merkmale</u></strong>
</h3>
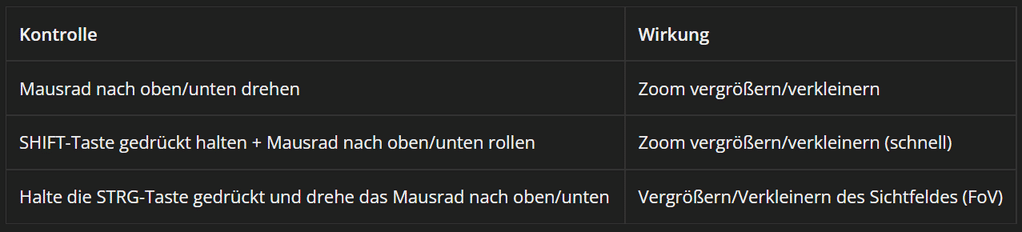
<p>Dieses Tool vereinfacht dir den Zoom im Kreuzungs-Editor.
Mit diesem Werkzeug kannst du:</p>
<ul>
<li>Standardwerte für den Kamerazoom und das FoV festlegen</li>
<li>Minimal- und Maximalwerte für den Kamerazoom und das FoV festlegen</li>
<li>Zoom und FoV mit dem Scrollrad Ihrer Maus einstellen (auch bei gedrückter SHIFT-Taste, um die Geschwindigkeit zu erhöhen/verringern)
<ul>
<li>Die Scrollgeschwindigkeit kann über Konfigurationsdateien feiner abgestimmt werden</li>
</ul>
</li>
</ul>
<p></p>
<p class="text-center"><woltlab-metacode data-name="attach" data-attributes="WyIxOTc0NjEiLCJub25lIiwiZmFsc2UiXQ=="></woltlab-metacode></p>
<p><br></p>
<p></p>
<p>Es gibt auch für dieses Tool mehrsprachige Unterstützung für <woltlab-metacode data-name="flag" data-attributes="WyJnYiJd"></woltlab-metacode> Englisch, <woltlab-metacode data-name="flag" data-attributes="WyJmciJd"></woltlab-metacode> Französisch, <woltlab-metacode data-name="flag" data-attributes="WyJkZSJd"></woltlab-metacode> Deutsch, <woltlab-metacode data-name="flag" data-attributes="WyJwbCJd"></woltlab-metacode> Polnisch und <woltlab-metacode data-name="flag" data-attributes="WyJmaSJd"></woltlab-metacode> Finnisch.</p>
<p></p>
<p>Zusätzliche Funktionen, wie z.B. die Anpassung von Modifikatortasten, werden in kommenden Updates eingepflegt.</p>
<p></p>
<h3>
<strong><u>Installation & Gebrauch</u></strong>
</h3>
<p><strong><span style="color:rgb(255,0,0);">---> HINWEIS - Es ist wichtig, dass Du alle unten aufgeführten Schritte in der angegebenen Reihenfolge ausführst! <---<br><br></span></strong></p>
<p><strong>Bitte beachte, dass für dieses Tool das .NET Framework 4.7.2 installiert sein muss.</strong></p>
<p>Wenn du Windows 7 oder eine vor April 2018 veröffentlichte Version von Windows 10 verwendst, muss dies manuell von <a href="https://dotnet.microsoft.com/en-us/download/dotnet-framework/net472">hier</a> aus installiert werden.</p>
<p>Ansonsten sind keine weiteren Maßnahmen erforderlich.</p>
<p><br></p>
<p><strong>Bitte beachte</strong>, dass der OMSI Crossing Editor einen Fehler aufweisen kann, bei dem die Hauptansicht nach einer unbestimmten Zeitspanne zufällig einfriert. Dieser Fehler wird nicht durch OMSI Crossing Editor Tools verursacht. Wenn dieser Fehler auftritt, speichere deine Arbeit, schließe die Anwendung und öffne sie erneut, deaktiviere die OMSI Crossing Editor Tools und aktiviere diese erneut.</p>
<p></p>
<ol>
<li>Stelle sicher, dass der OMSI Crossing Editor korrekt heruntergeladen wurde:<br>
--- <strong><span style="color:#FF0000;">Der Dateiname muss <kbd>OmsiObjEditP</kbd> lauten - das Tool wird nicht funktionieren, wenn der Pfad nicht korrekt ist!</span></strong>
<br>--- Die Datei muss sich im <kbd>SDK</kbd>-Ordner deines OMSI 2-Installationsordners befinden, damit der OMSI Crossing Editor korrekt funktioniert.
<br>
--- z.B. <kbd>C:\Program Files (x86)\Steam\steamapps\common\OMSI 2\SDK\OmsiObjEditP.exe</kbd>
<br>--- Du kannst den OMSI Crossing Editor von <a href="http://www.omnibussimulator.de/download/OMSI-SDK_Tools_1.00.zip">hier</a> herunterladen (Bitte in folgenden Ordner entpacken: <kbd>OMSI 2\SDK</kbd>)<br></li>
<li>Lade das OMSI Crossing Editor Tools .zip-Archiv herunter, öffne dies und entpacke den Inhalt des Ordners "Tool" in einen beliebigen Ordner auf deinem PC.<br></li>
<li>Schließe diesen Ordner von <strong>allen</strong> Antivirenprogrammen auf deinem PC aus, da es sonst zu Problemen kommen kann.<br></li>
<li>Wenn irgendwelche Spiele geöffnet sind, die Anti-Cheat-Software verwenden, schließe diese vor der Verwendung des Tools bitte!<br>
Diese Schritte müssen jedes Mal beim ersten Start des Tools durchgeführt werden.<br><br>Diese Schritte sind für die Funktionalität des Tools unerlässlich.<br>Keine Sorge – der Quellcode dieses Tools kann <a href="https://github.com/sjain882/OMSI-Crossing-Editor-Tools">hier</a> eingesehen werden.<br></li>
<li>Klicke mit der rechten Maustaste auf die OMSICrossingEditorTools.exe / Anwendungsdatei und klicke mit Rechtsklick auf "Als Administrator ausführen".<br>
Klicke auf "Ja", wenn die Benutzerkontensteuerung dazu auffordert.
<br>Ein kleines 🚦-Ampelsymbol sollte in dem Infobereich erscheinen (unten rechts in der Taskleiste)
<br><span style="color:#FF0000;"><strong>Es ist wichtig, dass dieser Schritt ausgeführen, <u>bevor</u> mit dem nächsten fortgefahren wird (aufgrund eines Fehlers im OMSI Crossing Editor)</strong></span><br></li>
<li>Öffne nun die Kopie des OMSI Crossing Editors.<br></li>
<li>Klicke oben links auf <kbd>Objekt</kbd> > <kbd>Laden...</kbd> und öffne die gewünschte <kbd>.sco</kbd> Datei aus <kbd>OMSI 2\Sceneryobjects</kbd>.<br>
<span style="color:#FF0000;"><strong>Es ist für die Funktionalität des Tools wichtig, dass zu diesem Zeitpunkt ein Objekt/eine Kreuzung geladen ist.</strong></span><strong><span style="color:rgb(255,0,0);"><br></span></strong></li>
<li>Klicke mit der rechten Maustaste auf das bereits erwähnte 🚦-Ampelsymbol in der Taskleiste und klicke auf "Tool aktivieren".<br></li>
<li>Klicke auf den OMSI-Kreuzungseditor, sodass dieser das fokussierte Fenster ist.<br>
<span style="color:#FF0000;"><strong>Dieses Werkzeug funktioniert nur, wenn der OMSI Crossing Editor fokussiert ist.</strong></span><strong><span style="color:rgb(255,0,0);"><br></span></strong></li>
<li>Wenn ein neues Objekt im Crossing-Editor geladen wird, deaktiviere das Tool, und starten dies anschließend erneut.<br><br>Wenn du ein neues Objekt im Kreuzungseditor startest, deaktiviere das Tool vor dem öffnen und reaktiviere es, nachdem das Objekt geladen hat.<br></li>
<li>Wenn gewünscht ist, können einige Einstellungen geändert werden, indem du mit der rechten Maustaste auf das 🚦-Ampelsymbol in deiner Taskleiste klickst und dann "Einstellungen bearbeiten" wählst. - öffnet eine Textdatei mit Beschreibungen für jede Einstellung in deiner Sprache. Hier können verschiedene Parameter angepasst werden.<br>
Bitte vergesse nicht, zu speichern und klicke anschließend auf das 🚦-Ampelsymbol und dann auf "Einstellungen neu laden".<br></li>
<li>Wenn die Arbeit mit dem OMSI Crossing Editor abgeschlossen ist, klicke mit der rechten Maustaste auf das 🚦-Ampelsymbol in der Taskleiste und auf "Beenden".</li>
</ol>
<p><br></p>
<h3>
<strong><u>Kredite</u></strong>
</h3>
<p><strong><woltlab-metacode data-name="user" data-attributes="WyIxMDM4MyJd">sjain</woltlab-metacode> </strong>- Reverse Engineering des OMSI Crossing Editors zur Erstellung dieses Tools<br></p>
<p><woltlab-metacode data-name="user" data-attributes="WyIxMzM4OSJd">Nano</woltlab-metacode> - Tests und Vorschläge<br></p>
<p><woltlab-metacode data-name="user" data-attributes="WyI3Mzk0Il0=">BowsyCh16</woltlab-metacode>, <woltlab-metacode data-name="user" data-attributes="WyI3OTQ0Il0=">Sobol</woltlab-metacode>, <woltlab-metacode data-name="user" data-attributes="WyI5NjgxIl0=">volvorider</woltlab-metacode> - Testen und Übersetzung<br></p>
<p><woltlab-metacode data-name="user" data-attributes="WyI5MDQ2Il0=">Erilambus</woltlab-metacode>, <woltlab-metacode data-name="user" data-attributes="WyI1MTYwIl0=">HalberCode</woltlab-metacode> - Übersetzung<br></p>
<p>Verschiedene C#.NET libraries - <a href="https://github.com/rickyah/ini-parser">ini-parser</a>, <a href="https://github.com/shy2net/WinputManager">WInputManager</a>, <a href="https://github.com/erfg12/memory.dll/">Memory.dll.x86<br></a></p>
</woltlab-spoiler>
<p></p><p><woltlab-metacode data-name="flag" data-attributes="WyJmciJd"></woltlab-metacode> <strong> Français:</strong></p><woltlab-spoiler data-label="Cliquez ici pour toutes les informations !">
<h3>
<strong><u>Pourquoi ?</u></strong>
</h3>
<p>Pendant des années, les développeurs de cartes ont été contraints d'utiliser le OMSI Crossing Editor de base (<kbd>OMSI 2\SDK\OmsiObjEditP.exe</kbd>) afin d'ajouter des chemins à leurs cartes.</p>
<p><br></p>
<p>Dans cet outil, le seul moyen de contrôler le niveau de zoom de la caméra est de cliquer sur un menu séparé et de faire glisser un curseur avec votre souris ! Ce qui est très pénible à utiliser.</p>
<p><br></p>
<p>En plus de cela, la valeur par défaut du FoV (Field-of View) de la caméra est bloquée à 30°, contre 45° dans le jeu principal d'OMSI 2, ce qui est légèrement désorientant.</p>
<p></p>
<h3>
<strong><u>Fonctionnalités</u></strong>
</h3>
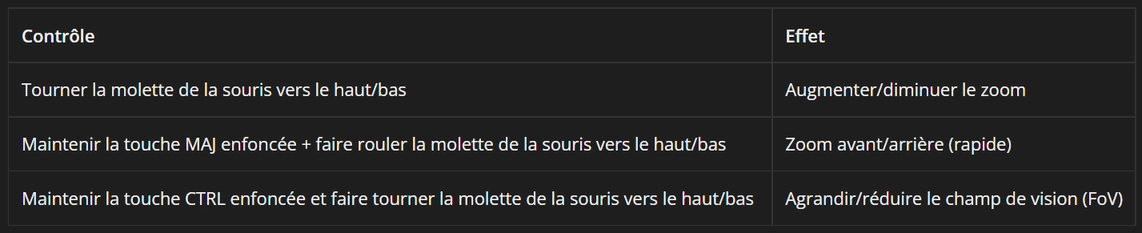
<p>Ne vous inquiétez pas - avec cet outil additionnel pour OMSI Crossing Editor, vous avez maintenant un contrôle total sur le zoom et le FOV dans l'OMSI Crossing Editor ! Avec mon outil, vous pouvez :</p>
<ul>
<li>Définir les valeurs par défaut du zoom et du FoV de la caméra.</li>
<li>Définissez les limites minimales et maximales du zoom et du champ de vision de la caméra.</li>
<li>Réglez facilement le zoom et le champ de vision avec la molette de votre souris (y compris en maintenant la touche SHIFT enfoncée pour augmenter/diminuer la vitesse).<br>
<ul>
<li>La vitesse de défilement peut être ajustée via les fichiers de configuration.<strong></strong></li>
</ul>
</li>
</ul>
<p></p>
<p class="text-center"><woltlab-metacode data-name="attach" data-attributes="WyIxOTc0NTkiLCJub25lIiwiZmFsc2UiXQ=="></woltlab-metacode></p>
<p><br></p>
<p></p>
<p>Il existe également un support multilingue pour les langues suivantes : <strong><woltlab-metacode data-name="flag" data-attributes="WyJnYiJd"></woltlab-metacode> Anglais, <woltlab-metacode data-name="flag" data-attributes="WyJmciJd"></woltlab-metacode> Français, <woltlab-metacode data-name="flag" data-attributes="WyJkZSJd"></woltlab-metacode> Allemand, <woltlab-metacode data-name="flag" data-attributes="WyJwbCJd"></woltlab-metacode></strong><strong> Polonais,</strong><strong> <woltlab-metacode data-name="flag" data-attributes="WyJmaSJd"></woltlab-metacode> Finlandais.</strong></p>
<p><strong><br></strong>Remarque : les fonctionnalités supplémentaires, telles que la personnalisation des touches de modification, sont réservées à d'éventuelles futures mises à jour.<strong><br></strong></p>
<h3>
<strong><u>Installation et utilisation (!</u></strong>)
</h3>
<p><strong><span style="color:rgb(255,0,0);">---> NOTE - Ce n'est pas ce que vous attendez ! Il est essentiel que vous suiviez toutes les étapes ci-dessous et dans l'ordre exact indiqué ! <---
<br></span></strong></p>
<p><strong>Veuillez noter que cet outil nécessite l'installation de .NET Framework 4.7.2.</strong></p>
<p>Si vous utilisez Windows 7 ou une version de Windows 10 publiée avant avril 2018, vous devez l'installer manuellement à partir <a href="https://dotnet.microsoft.com/en-us/download/dotnet-framework/net472">d'ici</a> ("Runtime").</p>
<p>Dans le cas contraire, aucune action n'est nécessaire.</p>
<p><br></p>
<p><strong>Veuillez noter</strong> que l'éditeur de croisement d'OMSI présente un bogue qui fait qu'après un laps de temps non spécifié, la vue principale se fige de manière aléatoire. Ce bogue n'est pas causé par les outils d'OMSI Crossing Editor. Si cela se produit, sauvegardez simplement votre travail, fermez et rouvrez l'application, puis désactivez et réactivez OMSI Crossing Editor Tools.</p>
<p><strong></strong></p>
<ol>
<li>Assurez-vous que vous avez correctement téléchargé OMSI Crossing Editor :<br>--- <span style="color:#FF0000;"><strong>Le nom du fichier doit être <kbd>OmsiObjEditP</kbd> - l'outil ne fonctionnera pas si vous l'avez renommé !</strong></span><span style="color:#FF0000;"><br></span>--- Le fichier doit être situé dans le dossier <kbd>SDK</kbd> de votre dossier d'installation d'OMSI 2, afin que OMSI Crossing Editor puisse fonctionner correctement.<br>--- Par exemple <kbd>C:\Program Files (x86)\Steam\steamapps\common\OMSI 2\SDK\OmsiObjEditP.exe</kbd><br>--- Vous pouvez télécharger OMSI Crossing Editor à partir d' <a href="http://www.omnibussimulator.de/download/OMSI-SDK_Tools_1.00.zip">ici</a> (extraire vers le dossier <kbd>OMSI 2\SDK</kbd>).<br></li>
<li>Télécharge l'archive OMSI Crossing Editor Tools .zip, ouvre-la et extrais le contenu du dossier "Tool" dans un dossier quelconque de ton PC.<br></li>
<li>Excluez ce dossier de tous les programmes anti-virus de votre PC, sinon vous risquez de rencontrer des problèmes.<br></li>
<li>Si vous avez des jeux ouverts qui utilisent un logiciel anti-triche, veuillez les fermer !<br>
Vous devez effectuer cette étape à chaque fois que vous lancez l'outil.<br><br>Ces étapes sont nécessaires en raison de la nature de l'outil.<br>Ne vous inquiétez pas, le code source de cet outil est disponible <a href="https://github.com/sjain882/OMSI-Crossing-Editor-Tools">ici</a>.<br></li>
<li>Faites un clic droit sur le fichier OMSICrossingEditorTools .exe et cliquez sur "Exécuter en tant qu'administrateur".<br>Cliquez sur "Oui" si le Contrôle de compte d'utilisateur vous le demande (UAC).<br>Une petite icône de feu tricolore 🚦 devrait apparaître dans votre barre de notification (en bas à droite de votre barre des tâches).<br><strong><span style="color:rgb(255,0,0);">Il est essentiel que vous fassiez cette étape avant de passer à la suivante (en raison d'un bug dans OMSI Crossing Editor).</span></strong><br></li>
<li>Maintenant, ouvrez OMSI Crossing Editor.<br></li>
<li>En haut à gauche, cliquez sur <kbd>Object</kbd> > <kbd>Load...</kbd> et ouvrez le fichier <kbd>.sco</kbd> de votre choix dans <kbd>OMSI 2\Sceneryobjects</kbd>.<br><strong><span style="color:rgb(255,0,0);">Il est essentiel que vous ayez un objet/un croisement chargé à ce stade.
<br></span></strong></li>
<li>Faites un clic droit sur l'icône du feu tricolore 🚦 mentionné précédemment dans votre barre d'état, puis cliquez sur "Activer l'outil" .<br></li>
<li>Cliquez sur l'éditeur de croisement OMSI de façon à ce qu'il soit la fenêtre focalisée.<br><strong><span style="color:rgb(255,0,0);">L'outil ne fonctionnera pas si vous n'avez pas l'éditeur de croisement OMSI en fenêtre principale sélectionnée.<br></span></strong></li>
<li>Utilisez les commandes énumérées dans le tableau de la section "Caractéristiques" ci-dessus.<br><br>
Si vous ouvrez un nouvel objet dans l'éditeur de croisements, veuillez désactiver l'outil avant de le faire, et le réactiver après son chargement.
<br></li>
<li>Si vous le souhaitez, vous pouvez modifier certains paramètres en faisant un clic droit sur l'icône du feu tricolore 🚦 dans votre barre d'état système, puis "Modifier les paramètres...". - un fichier texte contenant les descriptions de chaque paramètre dans votre langue s'ouvrira. Vous pouvez y régler divers paramètres.<br>
Lorsque vous avez terminé, enregistrez et fermez le fichier, puis cliquez avec le bouton droit de la souris sur l'icône du feu tricolore 🚦 dans votre barre d'état système, puis sur "Recharger les paramètres".
<br></li>
<li>Une fois que vous avez fini d'utiliser OMSI Crossing Editor, il est bon de faire un clic droit sur l'icône du feu de signalisation 🚦 dans votre barre d'état système, et de cliquer sur "Quitter".</li>
</ol>
<p><br></p>
<h3>
<strong><u>Crédits</u></strong>
</h3>
<p><strong><woltlab-metacode data-name="user" data-attributes="WyIxMDM4MyJd">sjain</woltlab-metacode> </strong>- Rétro-ingénierie de l'OMSI Crossing Editor, pour créer cet outil<br></p>
<p><woltlab-metacode data-name="user" data-attributes="WyIxMzM4OSJd">Nano</woltlab-metacode> - Tests et suggestions<br></p>
<p><woltlab-metacode data-name="user" data-attributes="WyI3Mzk0Il0=">BowsyCh16</woltlab-metacode>, <woltlab-metacode data-name="user" data-attributes="WyI3OTQ0Il0=">Sobol</woltlab-metacode>, <woltlab-metacode data-name="user" data-attributes="WyI5NjgxIl0=">volvorider</woltlab-metacode> - Tests et traduction<br></p>
<p><woltlab-metacode data-name="user" data-attributes="WyI5MDQ2Il0=">Erilambus</woltlab-metacode>, <woltlab-metacode data-name="user" data-attributes="WyI1MTYwIl0=">HalberCode</woltlab-metacode> - Traduction<br></p>
<p>Divers C#.NET libraries - <a href="https://github.com/rickyah/ini-parser">ini-parser</a>, <a href="https://github.com/shy2net/WinputManager">WInputManager</a>, <a href="https://github.com/erfg12/memory.dll/">Memory.dll.x86<br></a></p>
</woltlab-spoiler>
<h3>
<strong><u>Why?</u></strong>
</h3>
<p>For years, map developers have been forced to use the basic OMSI Crossing Editor (<kbd>OMSI 2\SDK\OmsiObjEditP.exe</kbd>) in order to add pathways to their maps. <br></p>
<p>In this tool, the <strong>only </strong><strong>way</strong> to control the zoom level of the camera is to click a separate menu and drag a slider with your mouse! This is very painful to use. <br></p>
<p>On top of this, the default camera FoV (Field-of View) value is locked at 30°, compared to 45° inside OMSI 2's main game, which is slightly disorienting. <br></p>
<h3>
<strong><u>Features</u></strong>
</h3>
<p>Not to worry - with OMSI Crossing Editor tools, you now have full control over the Zoom & FOV inside the OMSI Crossing Editor! With my tool, you can:</p>
<ul>
<li>Set default values for the camera zoom & FoV</li>
<li>Set minimum and maximum limits for the camera zoom & FoV</li>
<li>Easily adjust the Zoom & FoV with your mouse's scroll wheel (including holding the SHIFT key to increase/decrease speed)
<ul>
<li>The scrolling speed can be fine tuned via configuration files</li>
</ul>
</li>
</ul>
<p><br></p>
<p class="text-center"><woltlab-metacode data-name="attach" data-attributes="WyIxOTc0NjAiLCJub25lIiwiZmFsc2UiXQ=="></woltlab-metacode></p>
<p><strong></strong><br>There is also multilingual support for <strong><woltlab-metacode data-name="flag" data-attributes="WyJnYiJd"></woltlab-metacode> English, <woltlab-metacode data-name="flag" data-attributes="WyJmciJd"></woltlab-metacode> French, <woltlab-metacode data-name="flag" data-attributes="WyJkZSJd"></woltlab-metacode> German, <woltlab-metacode data-name="flag" data-attributes="WyJwbCJd"></woltlab-metacode></strong><strong> Polish and <woltlab-metacode data-name="flag" data-attributes="WyJmaSJd"></woltlab-metacode> Finnish.</strong><br><strong></strong><br>Please note: Additional functionality such as customization of modifier keys is reserved for potential future updates.<br><strong></strong></p>
<h3>
<strong><u>Installation & Usage (!</u></strong>)
</h3>
<p><strong><span style="color:rgb(255,0,0);">---> NOTE - These are not what you expect! It is critical that you follow all the below steps and in the exact order given! <---
<br><br></span></strong></p>
<p><strong>Please note that this tool requires .NET Framework 4.7.2 to be installed.</strong></p>
<p>If you are using Windows 7 or a version of Windows 10 released before April 2018, you must install it manually from <a href="https://dotnet.microsoft.com/en-us/download/dotnet-framework/net472">here</a> ("Runtime").</p>
<p>Otherwise, no action is required.</p>
<p><br></p>
<p><strong>Please note</strong> that the OMSI Crossing Editor has a bug where, after an unspecified amount of time, the main view will freeze randomly. This bug is not caused by OMSI Crossing Editor Tools. If this happens, simply save your work, close and re-open the application, then disable and re-enable OMSI Crossing Editor Tools.<br></p>
<ol>
<li>Ensure you have OMSI Crossing Editor downloaded correctly:<br>--- <span style="color:#FF0000;"><strong>The file name must be</strong> <kbd>OmsiObjEditP</kbd> - </span><strong><span style="color:#FF0000;">the tool will not work if you have renamed it</span></strong><span style="color:#FF0000;">!<br></span>--- The file must be located in the <kbd>SDK</kbd> folder of your OMSI 2 installation folder, so OMSI Crossing Editor can work correctly.<br>--- e.g., <kbd>C:\Program Files (x86)\Steam\steamapps\common\OMSI 2\SDK\OmsiObjEditP.exe</kbd><br>--- You can download the OMSI Crossing Editor from <a href="http://www.omnibussimulator.de/download/OMSI-SDK_Tools_1.00.zip">here</a> (extract to the <kbd>OMSI 2\SDK</kbd> folder)
<br></li>
<li>Download the OMSI Crossing Editor Tools .zip archive, open it, and extract the contents of the "Tool" folder to any folder on your PC.
<br></li>
<li>Exclude this folder from <strong>all </strong>anti-virus programs on your PC - or you may experience problems.
<br></li>
<li>If you have any games open that use anti-cheat software, please close them!<br>You must do this step each time you launch the tool.
<br><br>These steps are necessary due to the nature of the tool.<br>Don't worry - the source code of this tool is available to view <a href="https://github.com/sjain882/OMSI-Crossing-Editor-Tools">here</a>.
<br></li>
<li>Right click on the OMSICrossingEditorTools .exe / Application file and click "Run as administrator".<br>Click "Yes" if prompted by User Account Control.<br>A small 🚦 traffic light icon should appear in your notification tray (bottom right of your taskbar)<br><strong><span style="color:rgb(255,0,0);">It is critical that you do this step <u>before</u> continuing onto the next one (due to a bug in OMSI Crossing Editor)</span></strong>
<br></li>
<li>Now, open your copy of the OMSI Crossing Editor.
<br></li>
<li>In the top-left, click <kbd>Object</kbd> > <kbd>Load...</kbd> and open your desired <kbd>.sco</kbd> file from <kbd>OMSI 2\Sceneryobjects</kbd>.<br><strong><span style="color:rgb(255,0,0);">It is critical that you have an object/crossing loaded at this stage.
<br></span></strong></li>
<li>Right click on the previously mentioned 🚦 traffic light icon in your tray, and click "Enable tool" .<br></li>
<li>Click on the OMSI Crossing Editor so it is the focused window.<br><strong><span style="color:rgb(255,0,0);">The tool will not work unless you have the OMSI Crossing Editor focused.
<br></span></strong></li>
<li>Use the controls listed in the the table under the "Features" section above.
<br><br>If you are opening a new object in the Crossing Editor, please disable the tool before doing so, and re-enable it after it is loaded.<br></li>
<li>If you wish, you can change some settings by right clicking on the 🚦 traffic light icon in your tray, then "Edit settings..." - a text file with descriptions for each setting in your language will open. You can adjust various parameters here.<br>Once you have finished, save and close the file, then right click on the 🚦 traffic light icon in your tray, then "Reload settings".
<br></li>
<li>Once you have finished using OMSI Crossing Editor for the day, it's a good idea to right click on the 🚦 traffic light icon in your tray, and click "Exit".</li>
</ol>
<p><br></p>
<h3>
<strong><u>Credits</u></strong>
</h3>
<p><strong><woltlab-metacode data-name="user" data-attributes="WyIxMDM4MyJd">sjain</woltlab-metacode> </strong>- Reverse engineering of OMSI Crossing Editor, creating this tool<br></p>
<p><woltlab-metacode data-name="user" data-attributes="WyIxMzM4OSJd">Nano</woltlab-metacode> - Testing & suggestions<br></p>
<p><woltlab-metacode data-name="user" data-attributes="WyI3Mzk0Il0=">BowsyCh16</woltlab-metacode>, <woltlab-metacode data-name="user" data-attributes="WyI3OTQ0Il0=">Sobol</woltlab-metacode>, <woltlab-metacode data-name="user" data-attributes="WyI5NjgxIl0=">volvorider</woltlab-metacode> - Testing & translation<br></p>
<p><woltlab-metacode data-name="user" data-attributes="WyI5MDQ2Il0=">Erilambus</woltlab-metacode>, <woltlab-metacode data-name="user" data-attributes="WyI1MTYwIl0=">HalberCode</woltlab-metacode> - Translation<br></p>
<p>Various C#.NET libraries - <a href="https://github.com/rickyah/ini-parser">ini-parser</a>, <a href="https://github.com/shy2net/WinputManager">WInputManager</a>, <a href="https://github.com/erfg12/memory.dll/">Memory.dll.x86<br></a></p>
</woltlab-spoiler>
<p></p><p><woltlab-metacode data-name="flag" data-attributes="WyJkZSJd"></woltlab-metacode> <strong> Deutsch:</strong></p><woltlab-spoiler data-label="Klicken Sie hier für alle Informationen!">
<h3>
<strong><u>Warum?</u></strong>
</h3>
<p>Viele Kartenentwickler verwenden den einfachen OMSI Crossing Editor unter <kbd>OMSI 2\SDK\OmsiObjEditP.exe</kbd>, um ihren Karten Pfade hinzuzufügen.</p>
<p><br></p>
<p>In diesem Tool lässt sich die Zoomstufe der Kamera lediglich über ein separates Menü und einen Schieberegler mit der Maus steuern! Das ist sehr mühsam zu bedienen.<br></p>
<p>Darüber hinaus ist der Standardwert für das Sichtfeld der Kamera auf 30° festgelegt, während er im Hauptspiel von OMSI 2 bei 45° liegt, was etwas verwirrend ist.<br></p>
<p>Dieses Tool behebt diese Probleme.<br></p>
<h3>
<strong><u>Merkmale</u></strong>
</h3>
<p>Dieses Tool vereinfacht dir den Zoom im Kreuzungs-Editor.
Mit diesem Werkzeug kannst du:</p>
<ul>
<li>Standardwerte für den Kamerazoom und das FoV festlegen</li>
<li>Minimal- und Maximalwerte für den Kamerazoom und das FoV festlegen</li>
<li>Zoom und FoV mit dem Scrollrad Ihrer Maus einstellen (auch bei gedrückter SHIFT-Taste, um die Geschwindigkeit zu erhöhen/verringern)
<ul>
<li>Die Scrollgeschwindigkeit kann über Konfigurationsdateien feiner abgestimmt werden</li>
</ul>
</li>
</ul>
<p></p>
<p class="text-center"><woltlab-metacode data-name="attach" data-attributes="WyIxOTc0NjEiLCJub25lIiwiZmFsc2UiXQ=="></woltlab-metacode></p>
<p><br></p>
<p></p>
<p>Es gibt auch für dieses Tool mehrsprachige Unterstützung für <woltlab-metacode data-name="flag" data-attributes="WyJnYiJd"></woltlab-metacode> Englisch, <woltlab-metacode data-name="flag" data-attributes="WyJmciJd"></woltlab-metacode> Französisch, <woltlab-metacode data-name="flag" data-attributes="WyJkZSJd"></woltlab-metacode> Deutsch, <woltlab-metacode data-name="flag" data-attributes="WyJwbCJd"></woltlab-metacode> Polnisch und <woltlab-metacode data-name="flag" data-attributes="WyJmaSJd"></woltlab-metacode> Finnisch.</p>
<p></p>
<p>Zusätzliche Funktionen, wie z.B. die Anpassung von Modifikatortasten, werden in kommenden Updates eingepflegt.</p>
<p></p>
<h3>
<strong><u>Installation & Gebrauch</u></strong>
</h3>
<p><strong><span style="color:rgb(255,0,0);">---> HINWEIS - Es ist wichtig, dass Du alle unten aufgeführten Schritte in der angegebenen Reihenfolge ausführst! <---<br><br></span></strong></p>
<p><strong>Bitte beachte, dass für dieses Tool das .NET Framework 4.7.2 installiert sein muss.</strong></p>
<p>Wenn du Windows 7 oder eine vor April 2018 veröffentlichte Version von Windows 10 verwendst, muss dies manuell von <a href="https://dotnet.microsoft.com/en-us/download/dotnet-framework/net472">hier</a> aus installiert werden.</p>
<p>Ansonsten sind keine weiteren Maßnahmen erforderlich.</p>
<p><br></p>
<p><strong>Bitte beachte</strong>, dass der OMSI Crossing Editor einen Fehler aufweisen kann, bei dem die Hauptansicht nach einer unbestimmten Zeitspanne zufällig einfriert. Dieser Fehler wird nicht durch OMSI Crossing Editor Tools verursacht. Wenn dieser Fehler auftritt, speichere deine Arbeit, schließe die Anwendung und öffne sie erneut, deaktiviere die OMSI Crossing Editor Tools und aktiviere diese erneut.</p>
<p></p>
<ol>
<li>Stelle sicher, dass der OMSI Crossing Editor korrekt heruntergeladen wurde:<br>
--- <strong><span style="color:#FF0000;">Der Dateiname muss <kbd>OmsiObjEditP</kbd> lauten - das Tool wird nicht funktionieren, wenn der Pfad nicht korrekt ist!</span></strong>
<br>--- Die Datei muss sich im <kbd>SDK</kbd>-Ordner deines OMSI 2-Installationsordners befinden, damit der OMSI Crossing Editor korrekt funktioniert.
<br>
--- z.B. <kbd>C:\Program Files (x86)\Steam\steamapps\common\OMSI 2\SDK\OmsiObjEditP.exe</kbd>
<br>--- Du kannst den OMSI Crossing Editor von <a href="http://www.omnibussimulator.de/download/OMSI-SDK_Tools_1.00.zip">hier</a> herunterladen (Bitte in folgenden Ordner entpacken: <kbd>OMSI 2\SDK</kbd>)<br></li>
<li>Lade das OMSI Crossing Editor Tools .zip-Archiv herunter, öffne dies und entpacke den Inhalt des Ordners "Tool" in einen beliebigen Ordner auf deinem PC.<br></li>
<li>Schließe diesen Ordner von <strong>allen</strong> Antivirenprogrammen auf deinem PC aus, da es sonst zu Problemen kommen kann.<br></li>
<li>Wenn irgendwelche Spiele geöffnet sind, die Anti-Cheat-Software verwenden, schließe diese vor der Verwendung des Tools bitte!<br>
Diese Schritte müssen jedes Mal beim ersten Start des Tools durchgeführt werden.<br><br>Diese Schritte sind für die Funktionalität des Tools unerlässlich.<br>Keine Sorge – der Quellcode dieses Tools kann <a href="https://github.com/sjain882/OMSI-Crossing-Editor-Tools">hier</a> eingesehen werden.<br></li>
<li>Klicke mit der rechten Maustaste auf die OMSICrossingEditorTools.exe / Anwendungsdatei und klicke mit Rechtsklick auf "Als Administrator ausführen".<br>
Klicke auf "Ja", wenn die Benutzerkontensteuerung dazu auffordert.
<br>Ein kleines 🚦-Ampelsymbol sollte in dem Infobereich erscheinen (unten rechts in der Taskleiste)
<br><span style="color:#FF0000;"><strong>Es ist wichtig, dass dieser Schritt ausgeführen, <u>bevor</u> mit dem nächsten fortgefahren wird (aufgrund eines Fehlers im OMSI Crossing Editor)</strong></span><br></li>
<li>Öffne nun die Kopie des OMSI Crossing Editors.<br></li>
<li>Klicke oben links auf <kbd>Objekt</kbd> > <kbd>Laden...</kbd> und öffne die gewünschte <kbd>.sco</kbd> Datei aus <kbd>OMSI 2\Sceneryobjects</kbd>.<br>
<span style="color:#FF0000;"><strong>Es ist für die Funktionalität des Tools wichtig, dass zu diesem Zeitpunkt ein Objekt/eine Kreuzung geladen ist.</strong></span><strong><span style="color:rgb(255,0,0);"><br></span></strong></li>
<li>Klicke mit der rechten Maustaste auf das bereits erwähnte 🚦-Ampelsymbol in der Taskleiste und klicke auf "Tool aktivieren".<br></li>
<li>Klicke auf den OMSI-Kreuzungseditor, sodass dieser das fokussierte Fenster ist.<br>
<span style="color:#FF0000;"><strong>Dieses Werkzeug funktioniert nur, wenn der OMSI Crossing Editor fokussiert ist.</strong></span><strong><span style="color:rgb(255,0,0);"><br></span></strong></li>
<li>Wenn ein neues Objekt im Crossing-Editor geladen wird, deaktiviere das Tool, und starten dies anschließend erneut.<br><br>Wenn du ein neues Objekt im Kreuzungseditor startest, deaktiviere das Tool vor dem öffnen und reaktiviere es, nachdem das Objekt geladen hat.<br></li>
<li>Wenn gewünscht ist, können einige Einstellungen geändert werden, indem du mit der rechten Maustaste auf das 🚦-Ampelsymbol in deiner Taskleiste klickst und dann "Einstellungen bearbeiten" wählst. - öffnet eine Textdatei mit Beschreibungen für jede Einstellung in deiner Sprache. Hier können verschiedene Parameter angepasst werden.<br>
Bitte vergesse nicht, zu speichern und klicke anschließend auf das 🚦-Ampelsymbol und dann auf "Einstellungen neu laden".<br></li>
<li>Wenn die Arbeit mit dem OMSI Crossing Editor abgeschlossen ist, klicke mit der rechten Maustaste auf das 🚦-Ampelsymbol in der Taskleiste und auf "Beenden".</li>
</ol>
<p><br></p>
<h3>
<strong><u>Kredite</u></strong>
</h3>
<p><strong><woltlab-metacode data-name="user" data-attributes="WyIxMDM4MyJd">sjain</woltlab-metacode> </strong>- Reverse Engineering des OMSI Crossing Editors zur Erstellung dieses Tools<br></p>
<p><woltlab-metacode data-name="user" data-attributes="WyIxMzM4OSJd">Nano</woltlab-metacode> - Tests und Vorschläge<br></p>
<p><woltlab-metacode data-name="user" data-attributes="WyI3Mzk0Il0=">BowsyCh16</woltlab-metacode>, <woltlab-metacode data-name="user" data-attributes="WyI3OTQ0Il0=">Sobol</woltlab-metacode>, <woltlab-metacode data-name="user" data-attributes="WyI5NjgxIl0=">volvorider</woltlab-metacode> - Testen und Übersetzung<br></p>
<p><woltlab-metacode data-name="user" data-attributes="WyI5MDQ2Il0=">Erilambus</woltlab-metacode>, <woltlab-metacode data-name="user" data-attributes="WyI1MTYwIl0=">HalberCode</woltlab-metacode> - Übersetzung<br></p>
<p>Verschiedene C#.NET libraries - <a href="https://github.com/rickyah/ini-parser">ini-parser</a>, <a href="https://github.com/shy2net/WinputManager">WInputManager</a>, <a href="https://github.com/erfg12/memory.dll/">Memory.dll.x86<br></a></p>
</woltlab-spoiler>
<p></p><p><woltlab-metacode data-name="flag" data-attributes="WyJmciJd"></woltlab-metacode> <strong> Français:</strong></p><woltlab-spoiler data-label="Cliquez ici pour toutes les informations !">
<h3>
<strong><u>Pourquoi ?</u></strong>
</h3>
<p>Pendant des années, les développeurs de cartes ont été contraints d'utiliser le OMSI Crossing Editor de base (<kbd>OMSI 2\SDK\OmsiObjEditP.exe</kbd>) afin d'ajouter des chemins à leurs cartes.</p>
<p><br></p>
<p>Dans cet outil, le seul moyen de contrôler le niveau de zoom de la caméra est de cliquer sur un menu séparé et de faire glisser un curseur avec votre souris ! Ce qui est très pénible à utiliser.</p>
<p><br></p>
<p>En plus de cela, la valeur par défaut du FoV (Field-of View) de la caméra est bloquée à 30°, contre 45° dans le jeu principal d'OMSI 2, ce qui est légèrement désorientant.</p>
<p></p>
<h3>
<strong><u>Fonctionnalités</u></strong>
</h3>
<p>Ne vous inquiétez pas - avec cet outil additionnel pour OMSI Crossing Editor, vous avez maintenant un contrôle total sur le zoom et le FOV dans l'OMSI Crossing Editor ! Avec mon outil, vous pouvez :</p>
<ul>
<li>Définir les valeurs par défaut du zoom et du FoV de la caméra.</li>
<li>Définissez les limites minimales et maximales du zoom et du champ de vision de la caméra.</li>
<li>Réglez facilement le zoom et le champ de vision avec la molette de votre souris (y compris en maintenant la touche SHIFT enfoncée pour augmenter/diminuer la vitesse).<br>
<ul>
<li>La vitesse de défilement peut être ajustée via les fichiers de configuration.<strong></strong></li>
</ul>
</li>
</ul>
<p></p>
<p class="text-center"><woltlab-metacode data-name="attach" data-attributes="WyIxOTc0NTkiLCJub25lIiwiZmFsc2UiXQ=="></woltlab-metacode></p>
<p><br></p>
<p></p>
<p>Il existe également un support multilingue pour les langues suivantes : <strong><woltlab-metacode data-name="flag" data-attributes="WyJnYiJd"></woltlab-metacode> Anglais, <woltlab-metacode data-name="flag" data-attributes="WyJmciJd"></woltlab-metacode> Français, <woltlab-metacode data-name="flag" data-attributes="WyJkZSJd"></woltlab-metacode> Allemand, <woltlab-metacode data-name="flag" data-attributes="WyJwbCJd"></woltlab-metacode></strong><strong> Polonais,</strong><strong> <woltlab-metacode data-name="flag" data-attributes="WyJmaSJd"></woltlab-metacode> Finlandais.</strong></p>
<p><strong><br></strong>Remarque : les fonctionnalités supplémentaires, telles que la personnalisation des touches de modification, sont réservées à d'éventuelles futures mises à jour.<strong><br></strong></p>
<h3>
<strong><u>Installation et utilisation (!</u></strong>)
</h3>
<p><strong><span style="color:rgb(255,0,0);">---> NOTE - Ce n'est pas ce que vous attendez ! Il est essentiel que vous suiviez toutes les étapes ci-dessous et dans l'ordre exact indiqué ! <---
<br></span></strong></p>
<p><strong>Veuillez noter que cet outil nécessite l'installation de .NET Framework 4.7.2.</strong></p>
<p>Si vous utilisez Windows 7 ou une version de Windows 10 publiée avant avril 2018, vous devez l'installer manuellement à partir <a href="https://dotnet.microsoft.com/en-us/download/dotnet-framework/net472">d'ici</a> ("Runtime").</p>
<p>Dans le cas contraire, aucune action n'est nécessaire.</p>
<p><br></p>
<p><strong>Veuillez noter</strong> que l'éditeur de croisement d'OMSI présente un bogue qui fait qu'après un laps de temps non spécifié, la vue principale se fige de manière aléatoire. Ce bogue n'est pas causé par les outils d'OMSI Crossing Editor. Si cela se produit, sauvegardez simplement votre travail, fermez et rouvrez l'application, puis désactivez et réactivez OMSI Crossing Editor Tools.</p>
<p><strong></strong></p>
<ol>
<li>Assurez-vous que vous avez correctement téléchargé OMSI Crossing Editor :<br>--- <span style="color:#FF0000;"><strong>Le nom du fichier doit être <kbd>OmsiObjEditP</kbd> - l'outil ne fonctionnera pas si vous l'avez renommé !</strong></span><span style="color:#FF0000;"><br></span>--- Le fichier doit être situé dans le dossier <kbd>SDK</kbd> de votre dossier d'installation d'OMSI 2, afin que OMSI Crossing Editor puisse fonctionner correctement.<br>--- Par exemple <kbd>C:\Program Files (x86)\Steam\steamapps\common\OMSI 2\SDK\OmsiObjEditP.exe</kbd><br>--- Vous pouvez télécharger OMSI Crossing Editor à partir d' <a href="http://www.omnibussimulator.de/download/OMSI-SDK_Tools_1.00.zip">ici</a> (extraire vers le dossier <kbd>OMSI 2\SDK</kbd>).<br></li>
<li>Télécharge l'archive OMSI Crossing Editor Tools .zip, ouvre-la et extrais le contenu du dossier "Tool" dans un dossier quelconque de ton PC.<br></li>
<li>Excluez ce dossier de tous les programmes anti-virus de votre PC, sinon vous risquez de rencontrer des problèmes.<br></li>
<li>Si vous avez des jeux ouverts qui utilisent un logiciel anti-triche, veuillez les fermer !<br>
Vous devez effectuer cette étape à chaque fois que vous lancez l'outil.<br><br>Ces étapes sont nécessaires en raison de la nature de l'outil.<br>Ne vous inquiétez pas, le code source de cet outil est disponible <a href="https://github.com/sjain882/OMSI-Crossing-Editor-Tools">ici</a>.<br></li>
<li>Faites un clic droit sur le fichier OMSICrossingEditorTools .exe et cliquez sur "Exécuter en tant qu'administrateur".<br>Cliquez sur "Oui" si le Contrôle de compte d'utilisateur vous le demande (UAC).<br>Une petite icône de feu tricolore 🚦 devrait apparaître dans votre barre de notification (en bas à droite de votre barre des tâches).<br><strong><span style="color:rgb(255,0,0);">Il est essentiel que vous fassiez cette étape avant de passer à la suivante (en raison d'un bug dans OMSI Crossing Editor).</span></strong><br></li>
<li>Maintenant, ouvrez OMSI Crossing Editor.<br></li>
<li>En haut à gauche, cliquez sur <kbd>Object</kbd> > <kbd>Load...</kbd> et ouvrez le fichier <kbd>.sco</kbd> de votre choix dans <kbd>OMSI 2\Sceneryobjects</kbd>.<br><strong><span style="color:rgb(255,0,0);">Il est essentiel que vous ayez un objet/un croisement chargé à ce stade.
<br></span></strong></li>
<li>Faites un clic droit sur l'icône du feu tricolore 🚦 mentionné précédemment dans votre barre d'état, puis cliquez sur "Activer l'outil" .<br></li>
<li>Cliquez sur l'éditeur de croisement OMSI de façon à ce qu'il soit la fenêtre focalisée.<br><strong><span style="color:rgb(255,0,0);">L'outil ne fonctionnera pas si vous n'avez pas l'éditeur de croisement OMSI en fenêtre principale sélectionnée.<br></span></strong></li>
<li>Utilisez les commandes énumérées dans le tableau de la section "Caractéristiques" ci-dessus.<br><br>
Si vous ouvrez un nouvel objet dans l'éditeur de croisements, veuillez désactiver l'outil avant de le faire, et le réactiver après son chargement.
<br></li>
<li>Si vous le souhaitez, vous pouvez modifier certains paramètres en faisant un clic droit sur l'icône du feu tricolore 🚦 dans votre barre d'état système, puis "Modifier les paramètres...". - un fichier texte contenant les descriptions de chaque paramètre dans votre langue s'ouvrira. Vous pouvez y régler divers paramètres.<br>
Lorsque vous avez terminé, enregistrez et fermez le fichier, puis cliquez avec le bouton droit de la souris sur l'icône du feu tricolore 🚦 dans votre barre d'état système, puis sur "Recharger les paramètres".
<br></li>
<li>Une fois que vous avez fini d'utiliser OMSI Crossing Editor, il est bon de faire un clic droit sur l'icône du feu de signalisation 🚦 dans votre barre d'état système, et de cliquer sur "Quitter".</li>
</ol>
<p><br></p>
<h3>
<strong><u>Crédits</u></strong>
</h3>
<p><strong><woltlab-metacode data-name="user" data-attributes="WyIxMDM4MyJd">sjain</woltlab-metacode> </strong>- Rétro-ingénierie de l'OMSI Crossing Editor, pour créer cet outil<br></p>
<p><woltlab-metacode data-name="user" data-attributes="WyIxMzM4OSJd">Nano</woltlab-metacode> - Tests et suggestions<br></p>
<p><woltlab-metacode data-name="user" data-attributes="WyI3Mzk0Il0=">BowsyCh16</woltlab-metacode>, <woltlab-metacode data-name="user" data-attributes="WyI3OTQ0Il0=">Sobol</woltlab-metacode>, <woltlab-metacode data-name="user" data-attributes="WyI5NjgxIl0=">volvorider</woltlab-metacode> - Tests et traduction<br></p>
<p><woltlab-metacode data-name="user" data-attributes="WyI5MDQ2Il0=">Erilambus</woltlab-metacode>, <woltlab-metacode data-name="user" data-attributes="WyI1MTYwIl0=">HalberCode</woltlab-metacode> - Traduction<br></p>
<p>Divers C#.NET libraries - <a href="https://github.com/rickyah/ini-parser">ini-parser</a>, <a href="https://github.com/shy2net/WinputManager">WInputManager</a>, <a href="https://github.com/erfg12/memory.dll/">Memory.dll.x86<br></a></p>
</woltlab-spoiler>
Bilder